Do you like lightbulbs? Odd question, but a few years back, they were banned in the EU in favor of energy saving bulbs and many people stockpiled lightbulbs for a life-time. As an AnyLogic user, you might not be aware but you are provided with extremely useful lightbulbs for free!
I know, it has been too long since the last post but settling in at my new Berlin office and Christmas kept me busy. We will continue our user-interface series soon but this week, I slip in a quick lesson on a magic hidden piece of AnyLogic that many users overlook: the lightbulb.
Have you ever looked closely when you put the cursor into a code box to write some Java? Do it now. It probably looks like either of the 2 pictures below. Do you spot the difference? Can you see the magic lightbulb?

Well spotted. As soon as you put your cursor into some (but not all) code box in AnyLogic, a tiny yellow lightbulb appears at the top left corner of that box. It is there for a good reason…
Open an AnyLogic model and try to find a code box with a lightbulb. Remember, it only appears once you put your cursor into the box. In order to get the lightbulb glory, you then need to move your cursor carefully on top of it. This requires mastering your mouse to the fullest but it is well worth the effort. You will be rewarded with a cryptic message from the depth of a Java genius mind that clearly tries to communicate with you. Do not shy aware but engage with that riddle.

Depending on which code box you currently look at, you will see different cryptic messages. Some examples:
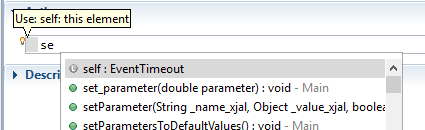
- Use: self
- Use: self: this element
- Use: index: index of replicated object
- Use: root: top-level agent
- Use: oldBlock, block: old and current blocks
Clearly, there is a pattern here. You seem to be asked to “use” something. In fact, you are getting a description for some special functionality that is only available in your current code box. Let’s explore each bit of the messages sequentially.
The “Use:” informs you that you can use some special keywords in your current code box. Yes, you might argue that you already know that because that is the purpose of the lightbulb appearing on your screen. Anyways…
The next part lists one or more keywords that you can apply. It is a comma-separated list that ends with the next colon. Usually, it is only one keyword but my last example above allows using two. You can type those words into your code box and they will be recognized as Java code. Try typing the first two letters and do a code-complete (press Ctrl+space).
The last part of your lightbulb text tries to explain what the keyword will mean. However, in my opinion, these explanations could be a wee bit more detailed. In my list of examples above, the first one lacks an explanation entirely. The rest is barely understandable to the lay modeller.
Many lightbulb keywords are similar. Let’s explore a few common ones to enable you to decipher the rare meanings as well:
“Self” always refers to the object in which you currently write code. In a “Source” object from the process library, for example, “Self” refers to this actual “Source” object and its properties. If you are a seasoned Java code, it might be helpful to see it as an equivalent to the Java syntax “this”.
Many objects from the process library (and some other objects that pass on agents) feature an “agent” keyword: this refers to any agent passing through this object. This way, you can change some property on each agent passing through.
In some experiment properties, you find the “root” keyword: this allows you to pass on values from your experiment screen to the root agent of your model (usually “Main”) before running your model. Also, you can feed back model information to your experiment screen after the run finished.
“Index” occurs in objects that contain more than one actual object, i.e. agent populations or replicated shapes. The “index” keyword will be of the same type as the replicated object and it refers to every object in the collection. In other words, AnyLogic loops across all collection objects to apply your code to them.
Mind the tiny lightbulb next to some code boxes. It enables amazing functionality that you should apply to enhance your models. Do not get scared by the cryptic message.
With practice, you will soon be able to enjoy friendly reminders such as “Use: index: index of replicated object”