
Google Maps 3D photogrammetry is now possible in AnyLogic
Nov 8
/
Benjamin Schumann
The other day, I was an astronaut. No, I was not (yet) invited by Jeff Bezoz to fly into space. But I did something no one had ever done before (afaik). Something I actually never thought possible:
I LOADED GOOGLE MAPS 3D PHOTOGRAMMETRY INTO MY MODEL!!!
Write your awesome label here.
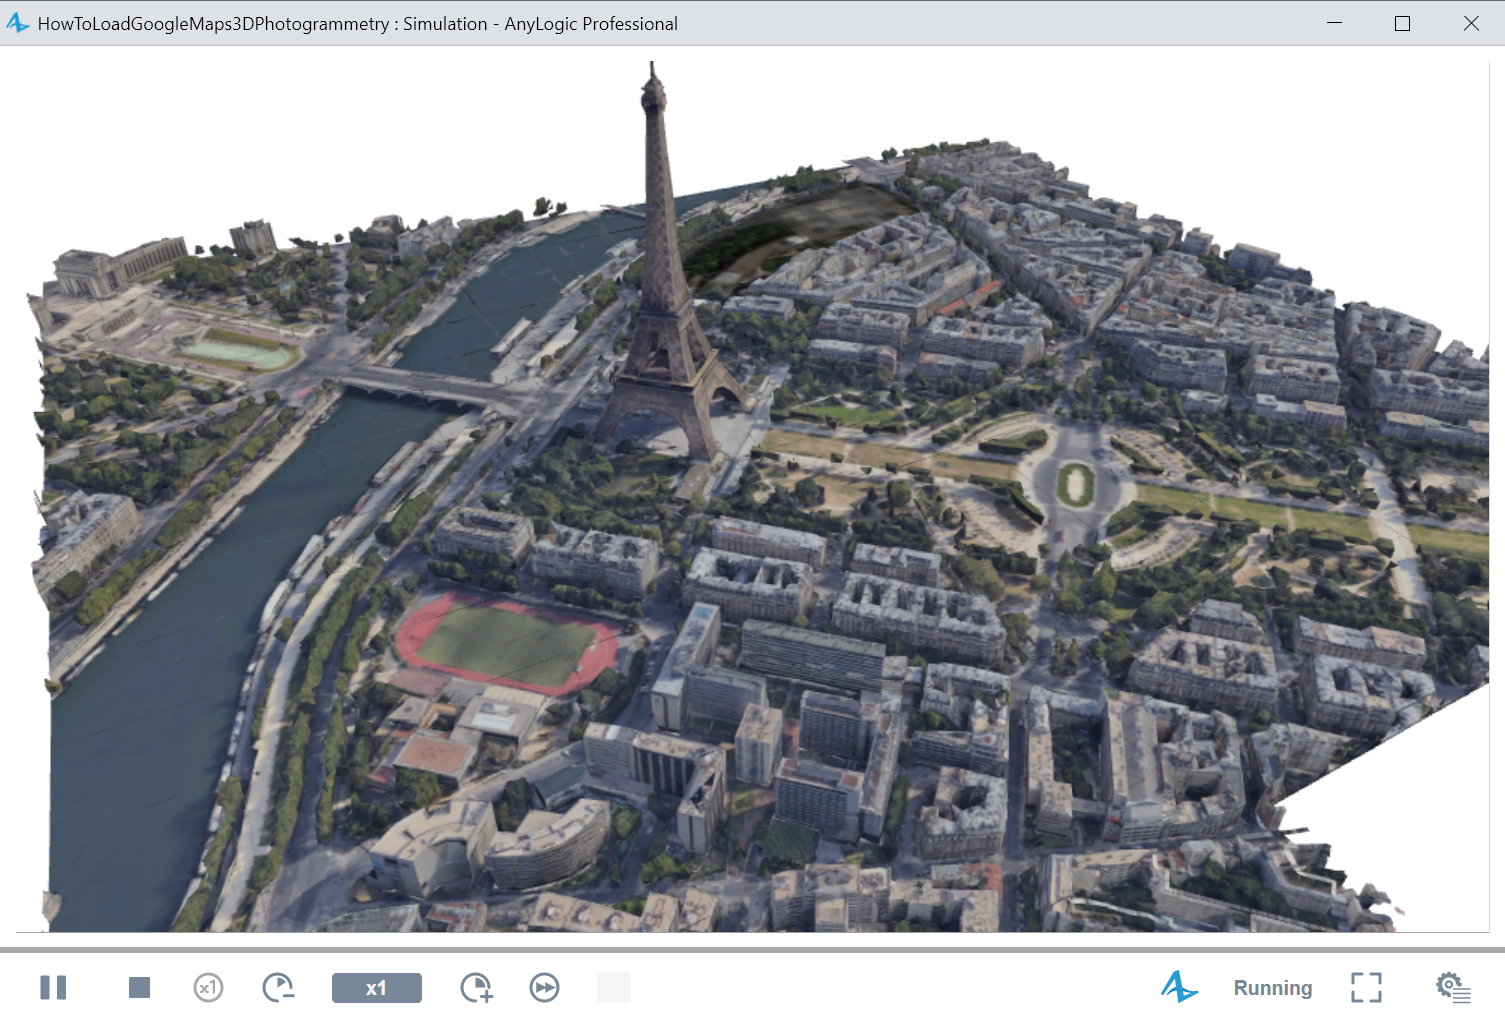
Does this look beautiful or what? Go try it yourself, it even works in the AnyLogic Cloud (you can download the model source files to see how I did things in AnyLogic, but try the steps below first):
Write your awesome label here.
However, it is not straightforward. So lets explore when to use it and how to actually achieve this feast :). None of my blog posts required this much work but I had to share it with you.
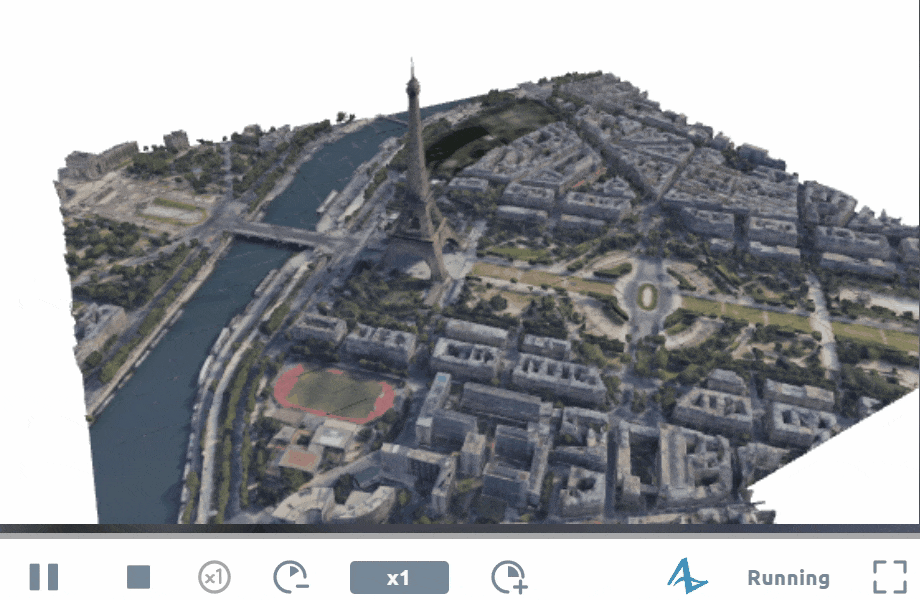
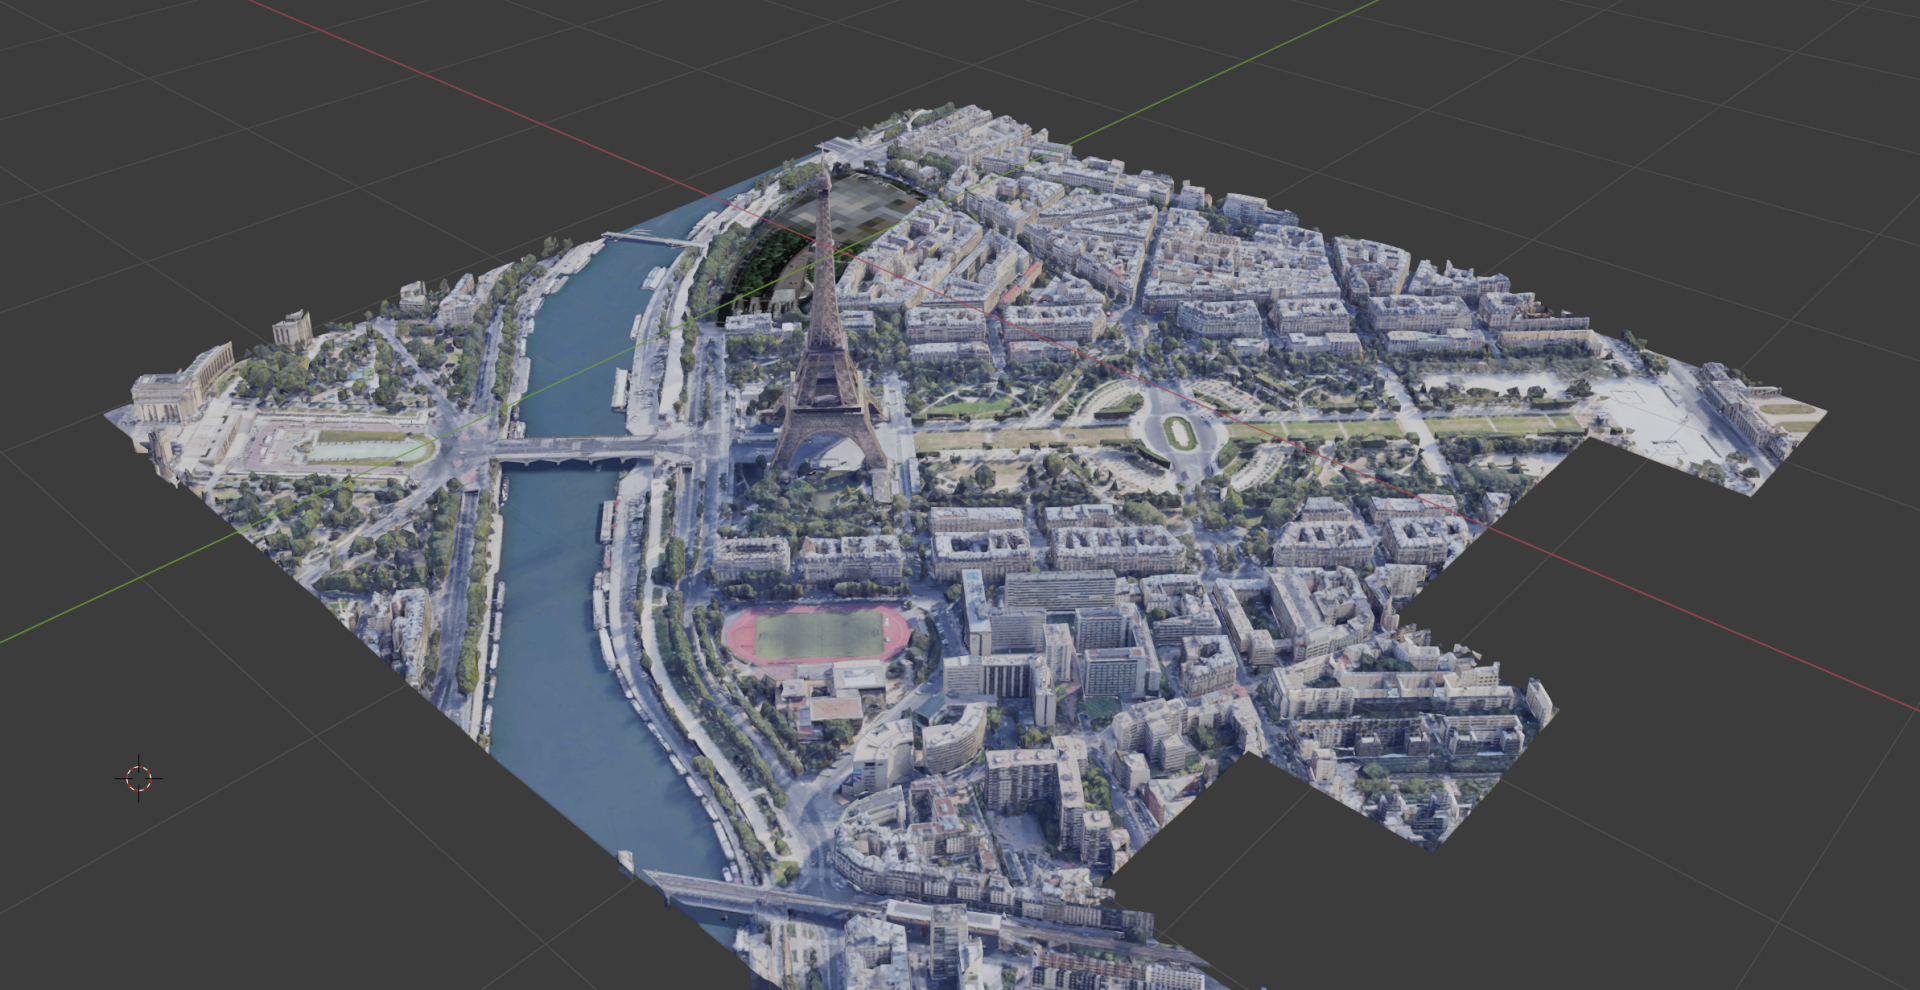
What it looks like
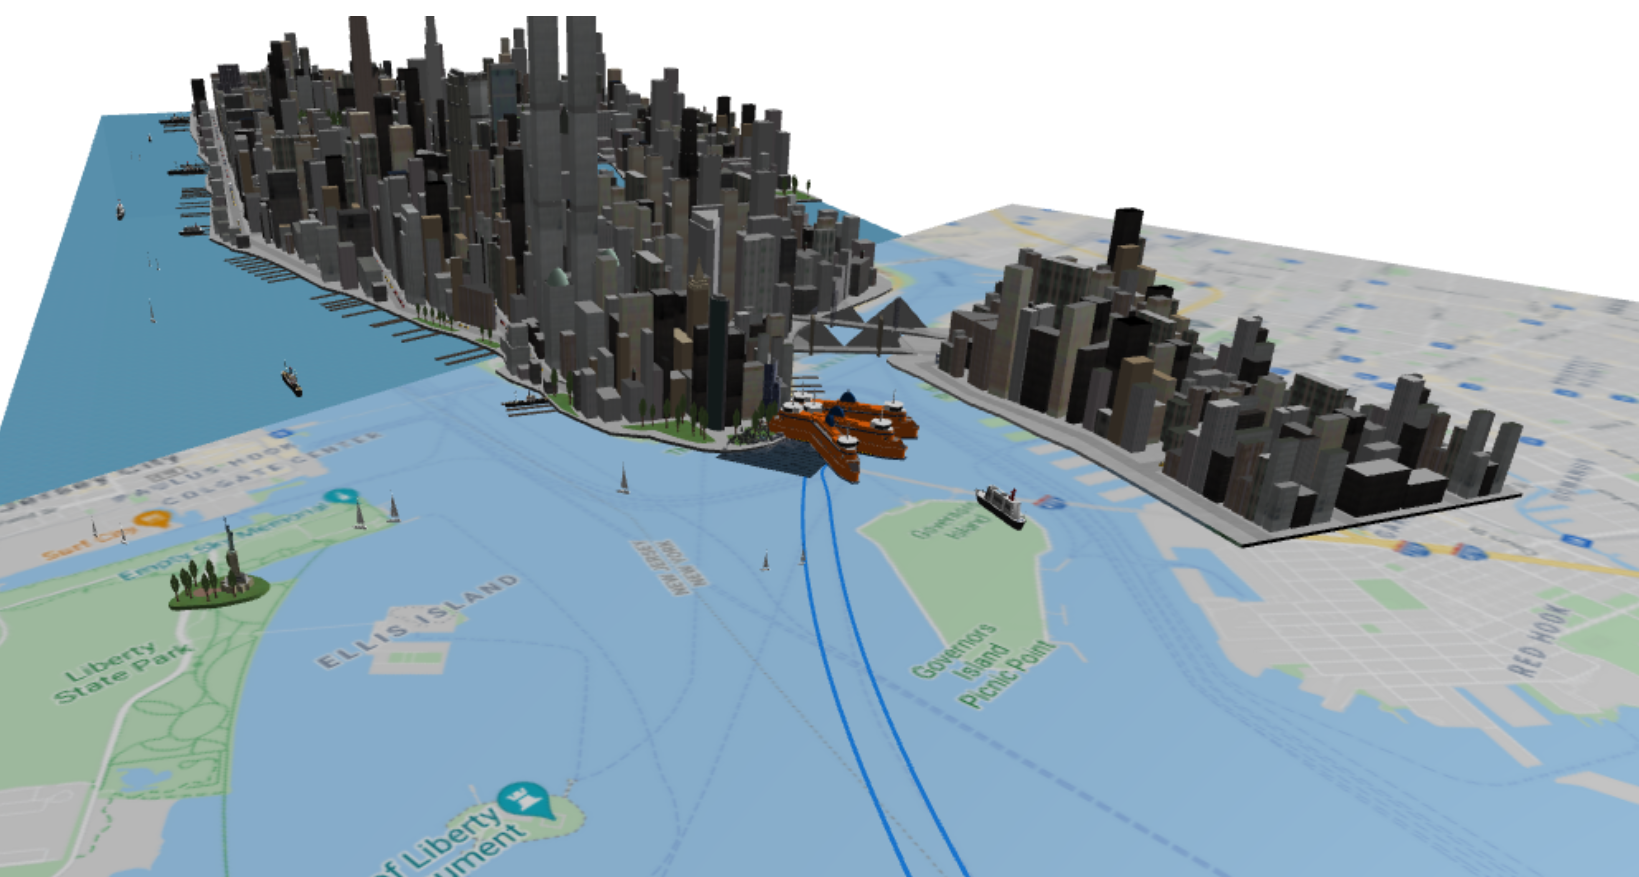
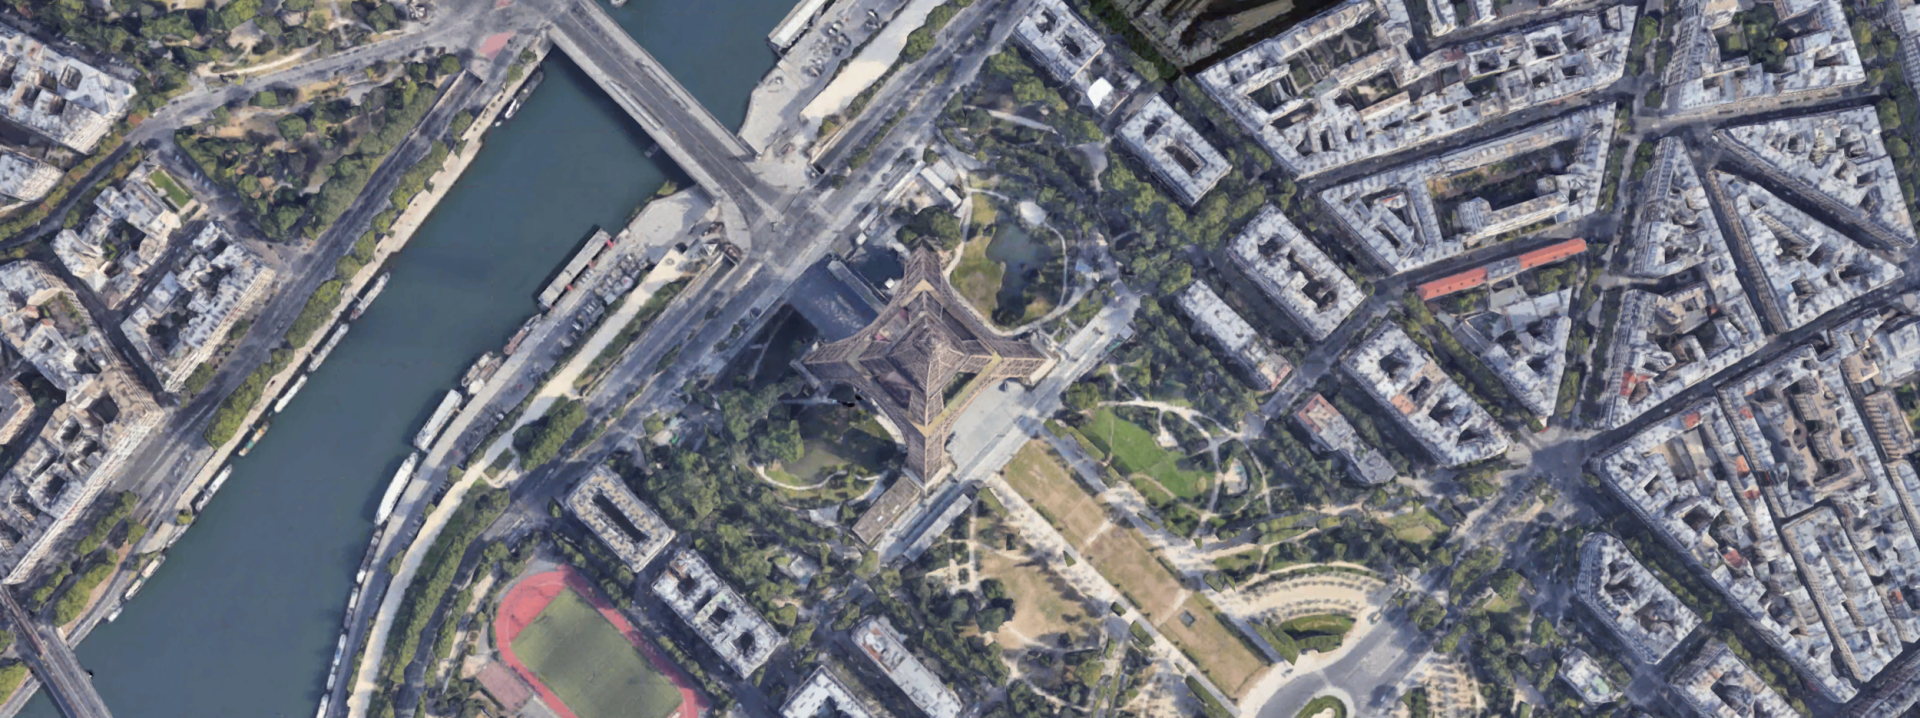
Before you embark on this journey, check out some examples to see if this is worth your time. In my opinion, models look fantastic with this approach, especially if you model something in a big city. The AnyLogic 3D rendering engine even allows for proper lighting (except real shadows, but hey). You have already seen Paris above. How about New York City? These are from a recent client study, showing how agents and a map work really well with our photogrammetry:
When to use it
Performance
Ok, this does look quite amazing. And as you may notice in the cloud demo, the 3D performance is also surprisingly good. It does not reduce runtime performance of your model at all.
However, there is a substantial cost to loading the model up. Even small 3D scenes cost seconds to be loaded. Large scenes can take even longer. However, it never seems to break, it just takes a while.
However, there is a substantial cost to loading the model up. Even small 3D scenes cost seconds to be loaded. Large scenes can take even longer. However, it never seems to break, it just takes a while.
So my suggestion is to let users choose upfront what they want to load. For demos, go all in. But for normal executions, just turn it off.
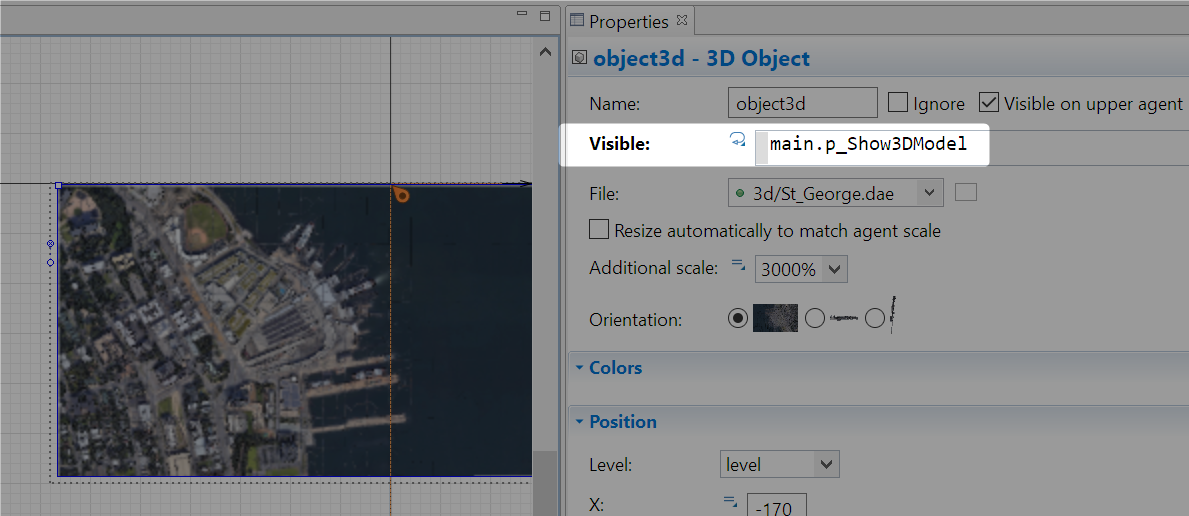
The easiest way is to define a boolean parameter show3DModel on your Main. Then, simply use it to guide the 3D model visibility:
Legal stuff
Please be aware that Google has rules about how to use its data. You must make your own decision if you are eligible to follow this approach for your models under their “fair use” guidelines. I cannot help you there :). Obviously, I cannot accept any liability resulting from you using Google Maps data.
STEP-BY-STEP INSTRUCTIONS
So you want to learn and apply this yourself? Let’s get kicking.
PREREQUISITES
- this workflow only works on Windows (10, not tested 11)
- The technical foundation is based on this video, do check that as well for more details (or if you are stuck with my text descriptions below)
INSTALLATION & SETUP
These steps are only necessary the very first time you try this. Note the tool versions applied. I cannot guarantee it works with newer versions so maybe try with the versions I specify first:
- Download MapsModelImporter. Store the zip file anywhere you like. I tested it with release v0.4.0
- Download and install Blender. I tested it with version 2.93.4
- Activate MapsModelImporter within Blender (refer to the original video for visuals):
- Open Blender, go to “Edit”, “Preferences”
- In the “Addons” tab, click the “Install” buttonSelect the MapsModelImporter zip file you downloaded previously
- Ensure to tick the box as below:

- Download and install RenderDoc. I tested it with version v1.13
- Install Chrome (latest version should be fine).
- Go to your Chrome application folder. In my case, it was in C:\Program Files\Google\Chrome\Application but this can vary
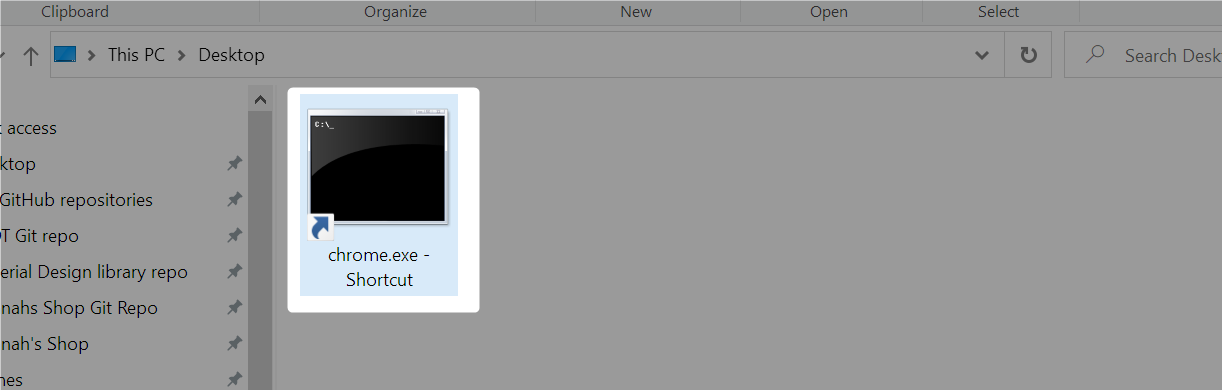
- find the Chrome.exe file. Right-click and click “Create shortcut”. Accept if it wants to create the shortcut on your Desktop
- Go to the Desktop, right-click the shortcut, open its “Properties”
- Replace the “Target” text box with this text: C:\Windows\System32\cmd.exe /c "SET RENDERDOC_HOOK_EGL=0 && START "" ^"C:\Program Files\Google\Chrome\Application\chrome.exe^" --disable-gpu-sandbox --gpu-startup-dialog"
- NOTE: If your original Chrom application folder was somewhere else, you need to adjust it in this text so it can be found!
- Click “Apply” and close the Properties. Your shortcut icon will now look like a command-prompt DOS application
Great, you finished the trickiest bit now. All tools are installed and ready for use. Let’s try to get it to work.
Usage
These are the steps you need to follow every time you want to extract a 3D file.
3D SNAPSHOT
Before you start, make sure that normal Google Chrome is closed, i.e. do not read this blog post in Chrome itself, use a different browser :)
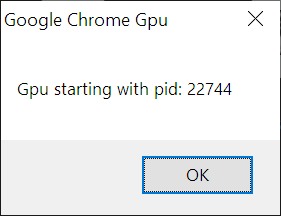
- Double-click your Google Chrome shortcut on the desktop. (Do not try it with normal Chrome, it will not work)
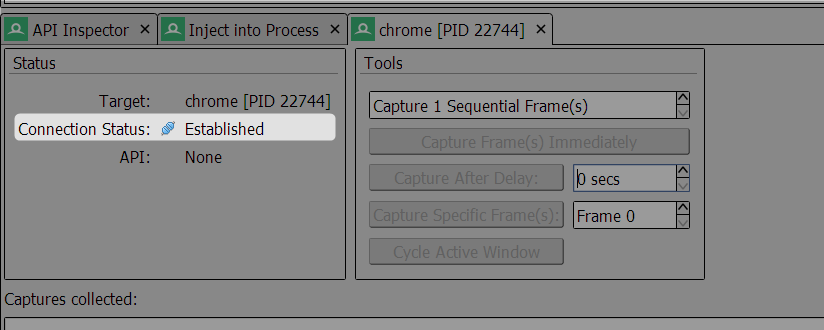
- 2 windows will open. A normal Chrome tab and a special small window telling you about a “pid” code as below. Take note (it is different every time) but do not yet close this small popup
- Open RenderDoc
- go to “File” -> “Inject into process”
- Search for the pid number you noted down:
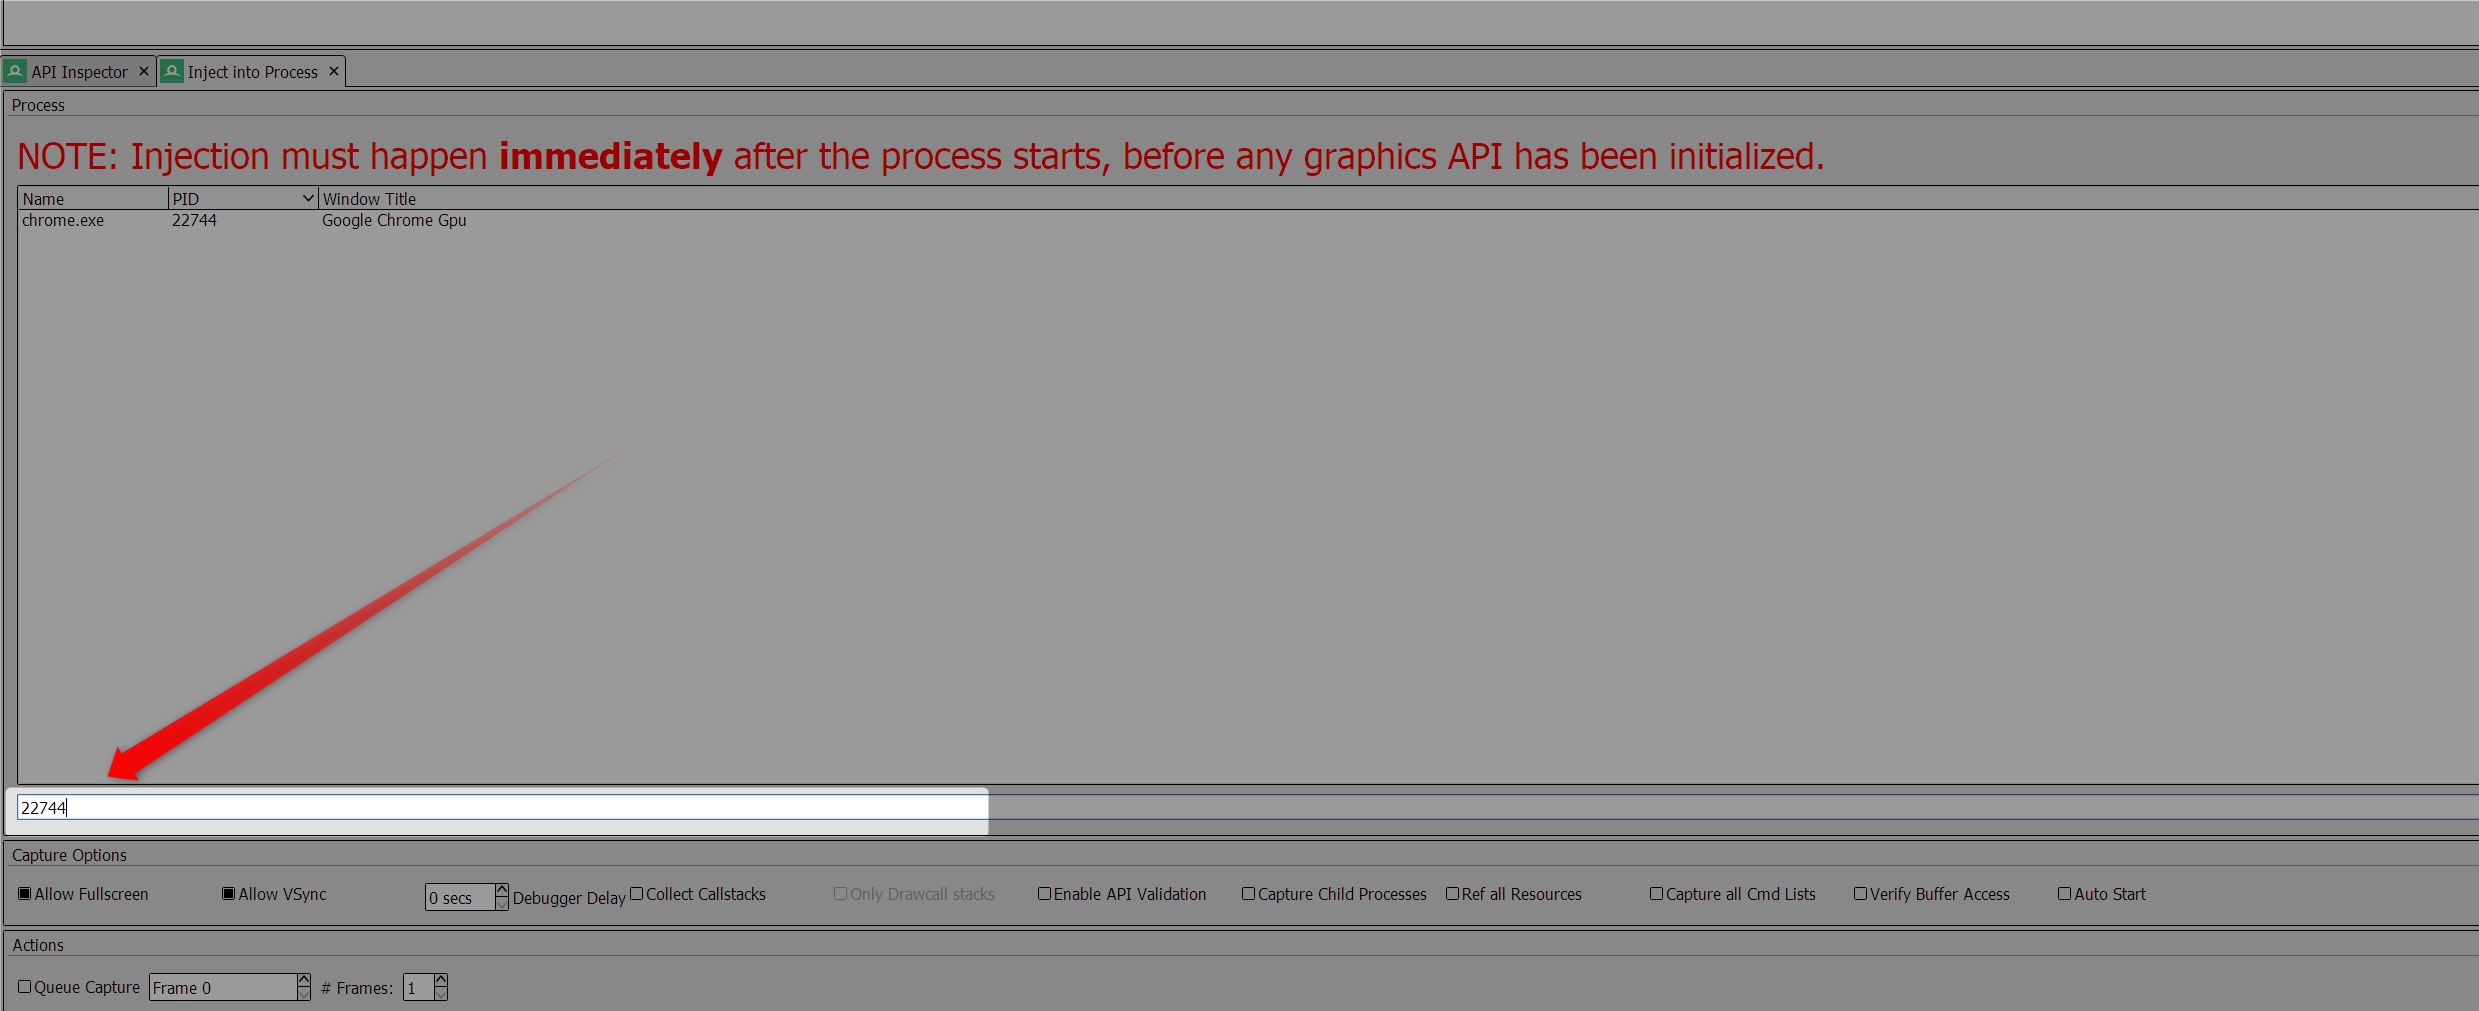
- Note that it should find a “chrome.exe” process above.
- Select it and press “Inject” in the bottom right corner
- If you did it correctly, you should see the “Connection Status” as “Establish, see below
- Go back to the small additional Chrome popup with the pid number and close it
- In the Chrome window, go to maps.google.com and navigate to your destination of choice
- obviously go somewhere with 3D photogrammetry and switch to the “Satellite” view
- You can stay in the top-view, just make sure you see the 3D photogrammetry
- Switch to RenderDoc and click “Capture Frame(s) immediately”
- Switch to Chrome and WIGGLE the 3D view with your mouse briefly. Just a second or 2
- Switch back to RenderDoc and you should see your 3D “screenshot” displayed
- Go to “File” -> “Save capture as “
- safe the “.rdc” file somewhere you choose
- Note that you should do these steps fairly fast. Sometimes, RenderDoc gets impatient, but you get to grips with these steps quickly :)
CONVERTING TO DAE FILE FORMAT
Alright, we have the raw file. Now, we need to convert it into something that AnyLogic can read, a “.dae” file. Blender will help with that:
- Open Blender and open a new normal project
- delete the default cube that is provided (click and click “delete” on your keyboard)
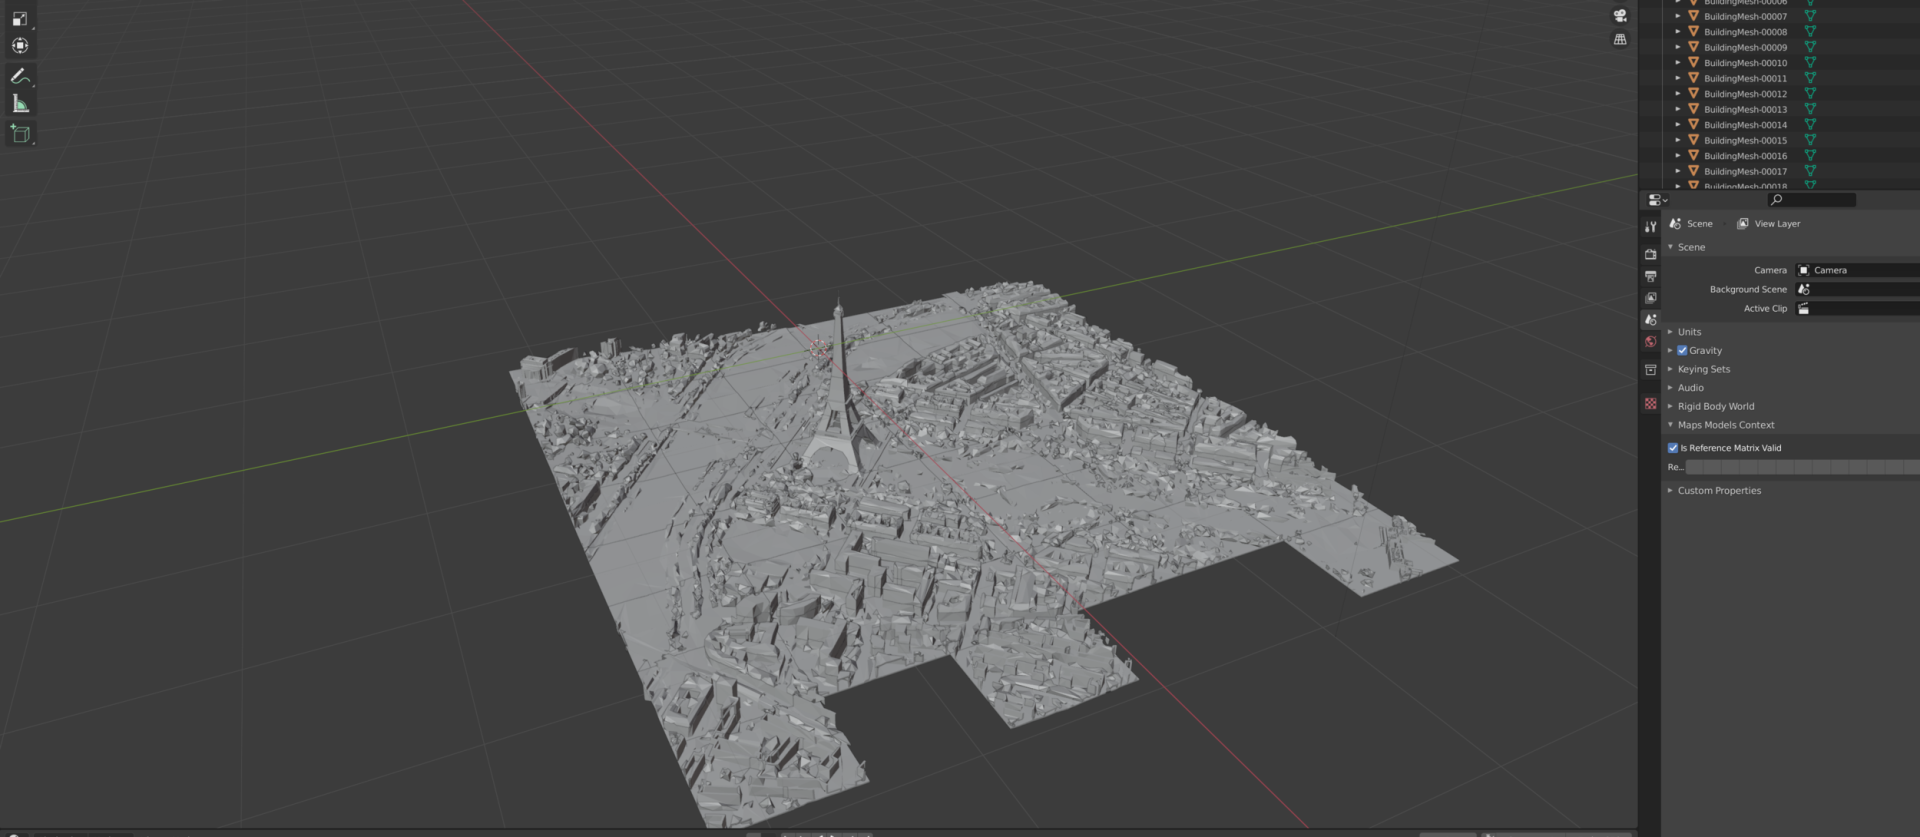
- Go to “File” -> “Import” -> “Google Maps capture (.rdc)”
- Select and load your “.rdc” file and wait a few seconds
- Hopefully, you see some gray glory as below
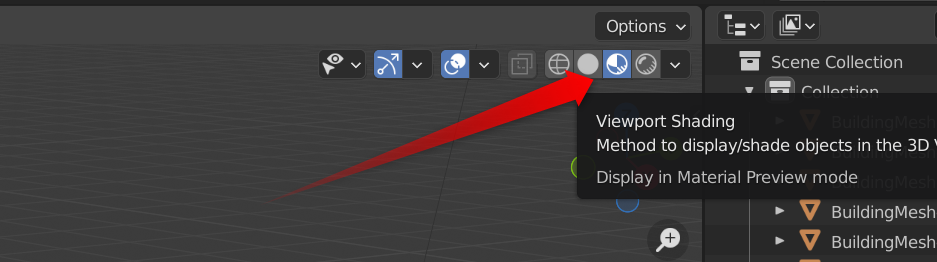
If you click on the “Viewport shading” button in the top-right corner, you will even get it in full color with textures:
- Lastly, in Blender click “File” -> “Export” -> “Collada (default) .dae”
- Export into a separate new folder of your choice (it will create many files in there)
- Close Blender
Congrats, another difficult piece of the work done. The last step will be trivial in comparison…
LOADING INTO ANYLOGIC
Finally, we can see the fruit of our hard work. Load up AnyLogic, create a new model and drag in a “3D-window” element from the “Presentation” palette. Change its “Far clipping distance” to a higher value, typically 20000-50000 works (it depends on the scale of your photogrammetry).
Next, create a subfolder named “3d” (exactly that name!). Paste all files that you created with Blender above, i.e. 1 file ending on “.dae” and a lot of “.png” images.
Next, drag in a “3D-object” element and select the “.dae” file for it (from the “3d” subfolder). You may get a popup saying something like “Files have absolute path”. You can ignore that.
Play with settings for the 3D-object, your camera setup, the orientation and scale of your 3D-object until it displays correct (see section below). Eventually, you should have a beautiful photogrammetry loaded:
Troubleshooting
You may not immediately see what you are expecting, so play with these settings to get things right:
- Clipping distance: Ensure to set it to a high-enough value for your 3D-window object. Default values are often too low for this.
- Wait: depending on the size of your scenery (and your machine capability), it make take several seconds to load anything into the 3D window
- Position: use a “Camera” object to ensure you actually view the scenery (Check the help how to use cameras well)
- Orientation: In the properties of your 3D-object, choose the correct orientation so it displays “levelled”
- Scale: Often, the sceneries are very small upon loading. Play with the 3D-object setting on scale
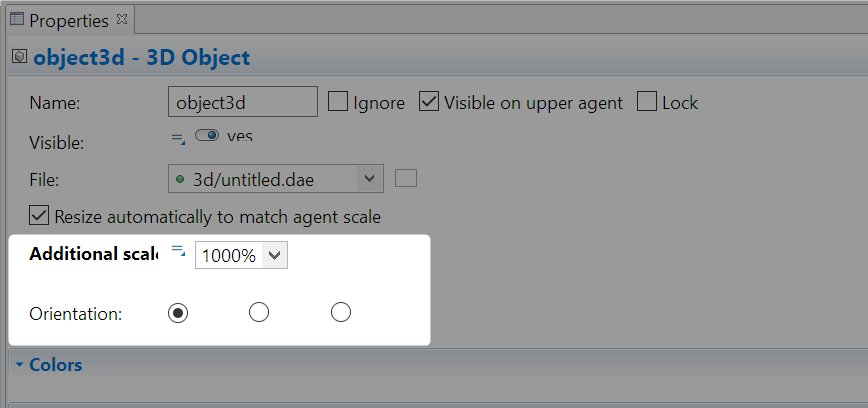
Ensure to play with scale and orientation settings to display your scenery as desired
USE IN ANYLOGIC CLOUD
In order to use your photogrammetry in the AnyLogic cloud, there are two additional steps required, to ensure the image files are also uploaded and applied in the cloud:
- In your Projects view under “Resources” -> “Images”, you see a list of all the “.png” files used. Select all and tick the property “Resource is referenced from user code”
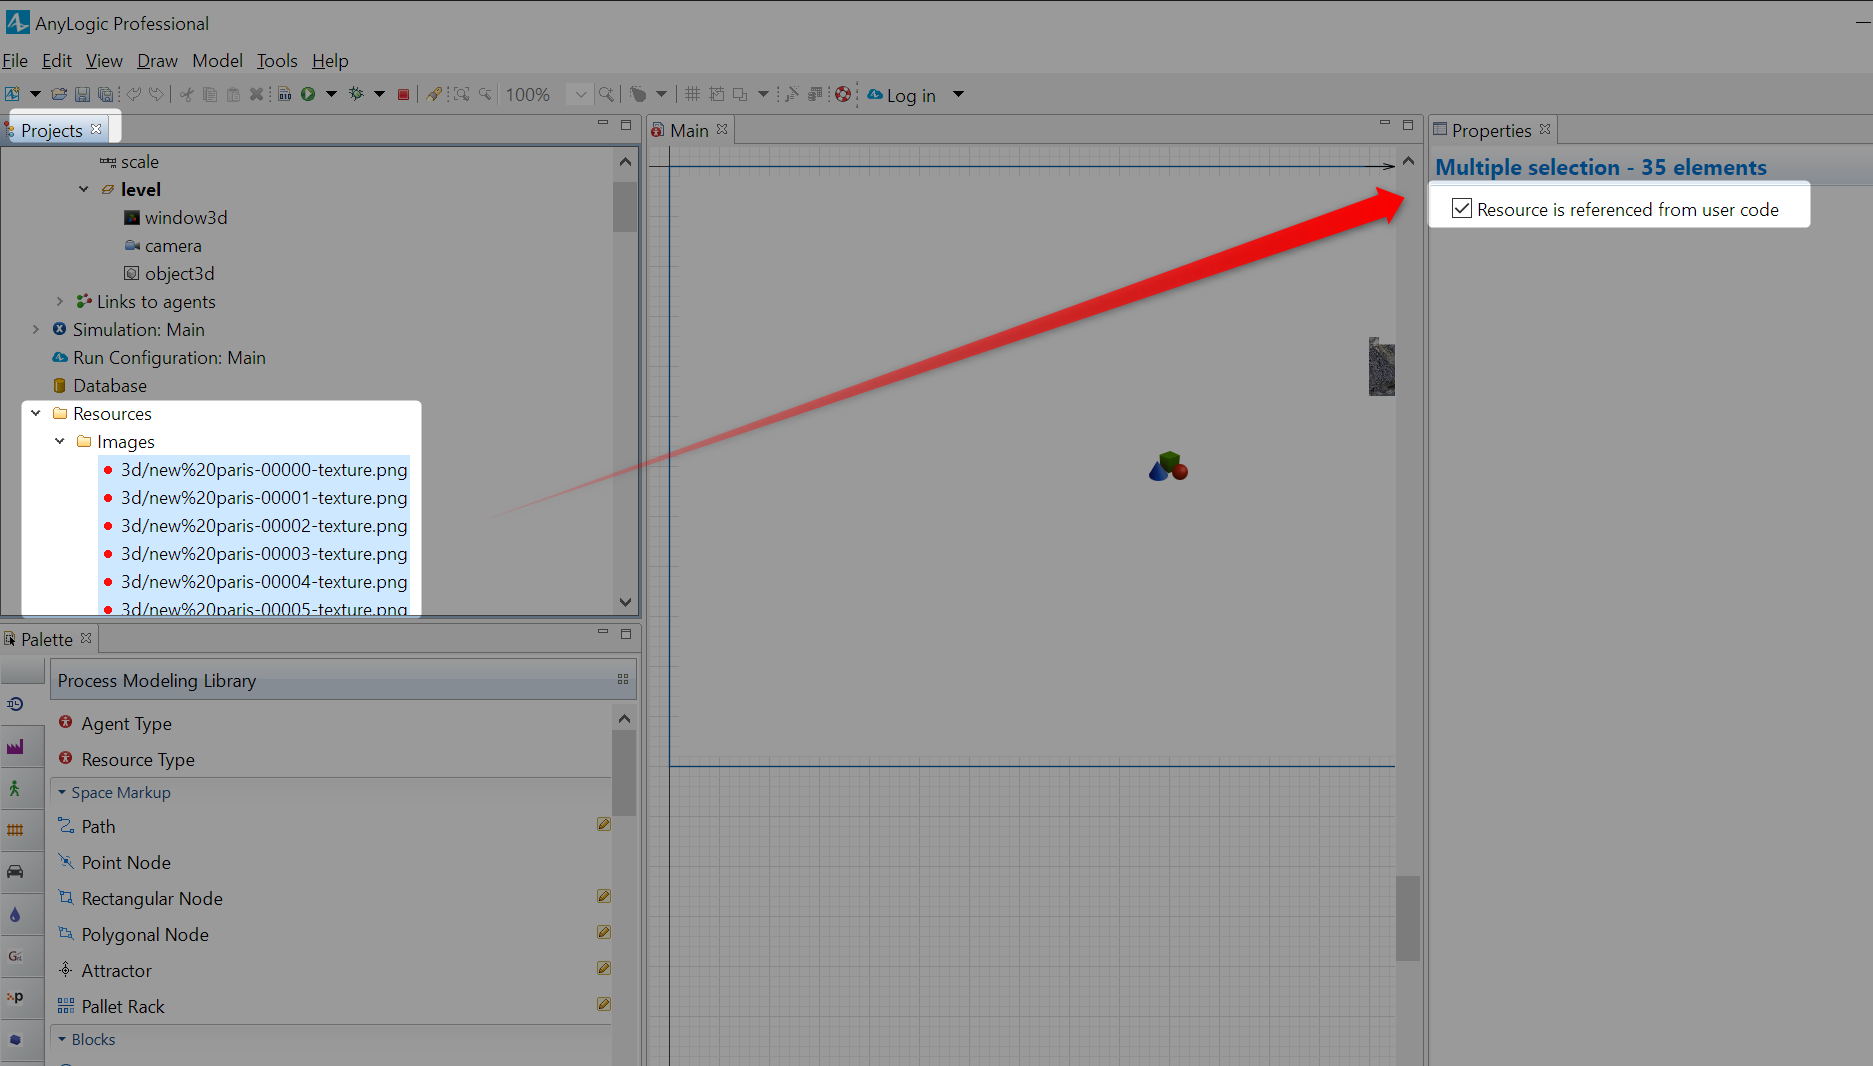
Ensure that all images are “referenced from user code”
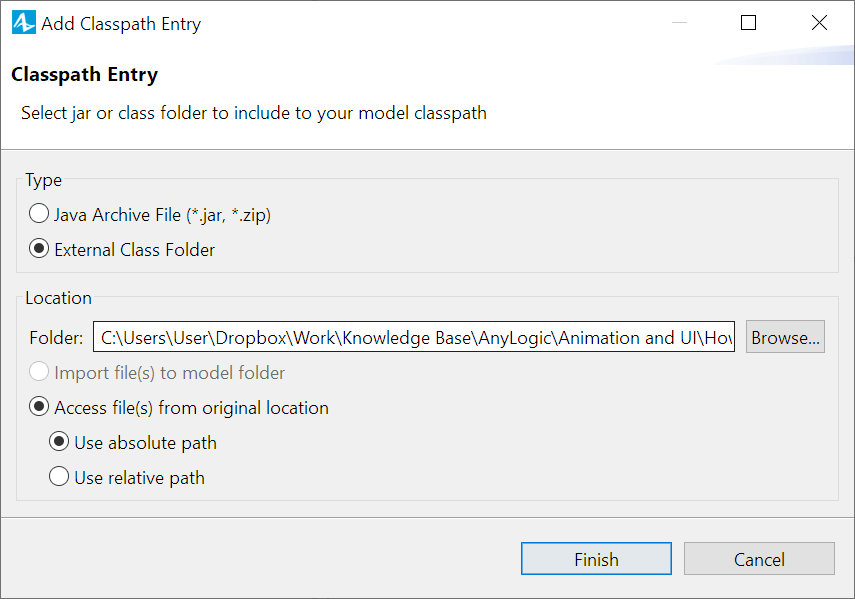
- Open your model properties (click on the model itself in the “Projects” view, as below left). Add a class folder by clicking the small “+” icon as below left
- specify the “3d” subfolder of your model as an “External class folder”, applying the settings as below right. Click “Finish”
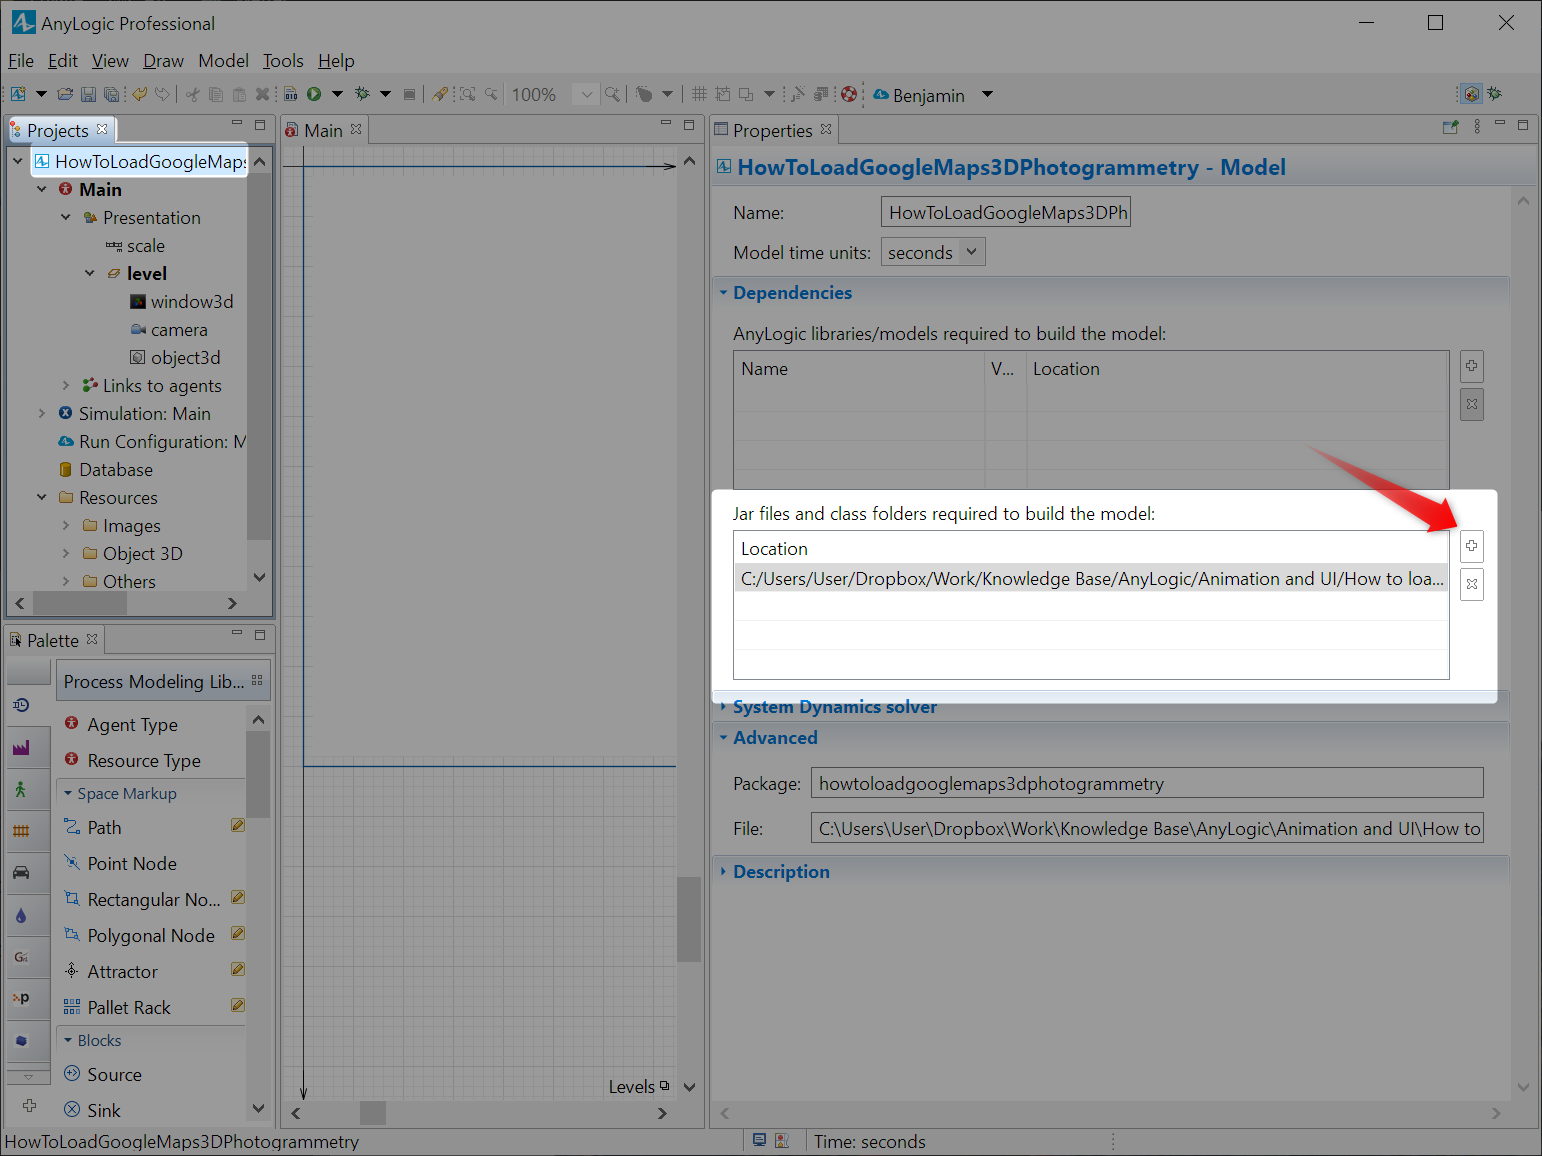
Click on your model to access its properties
Use the settings to specify the “3d” subfolder as an “External class folder”
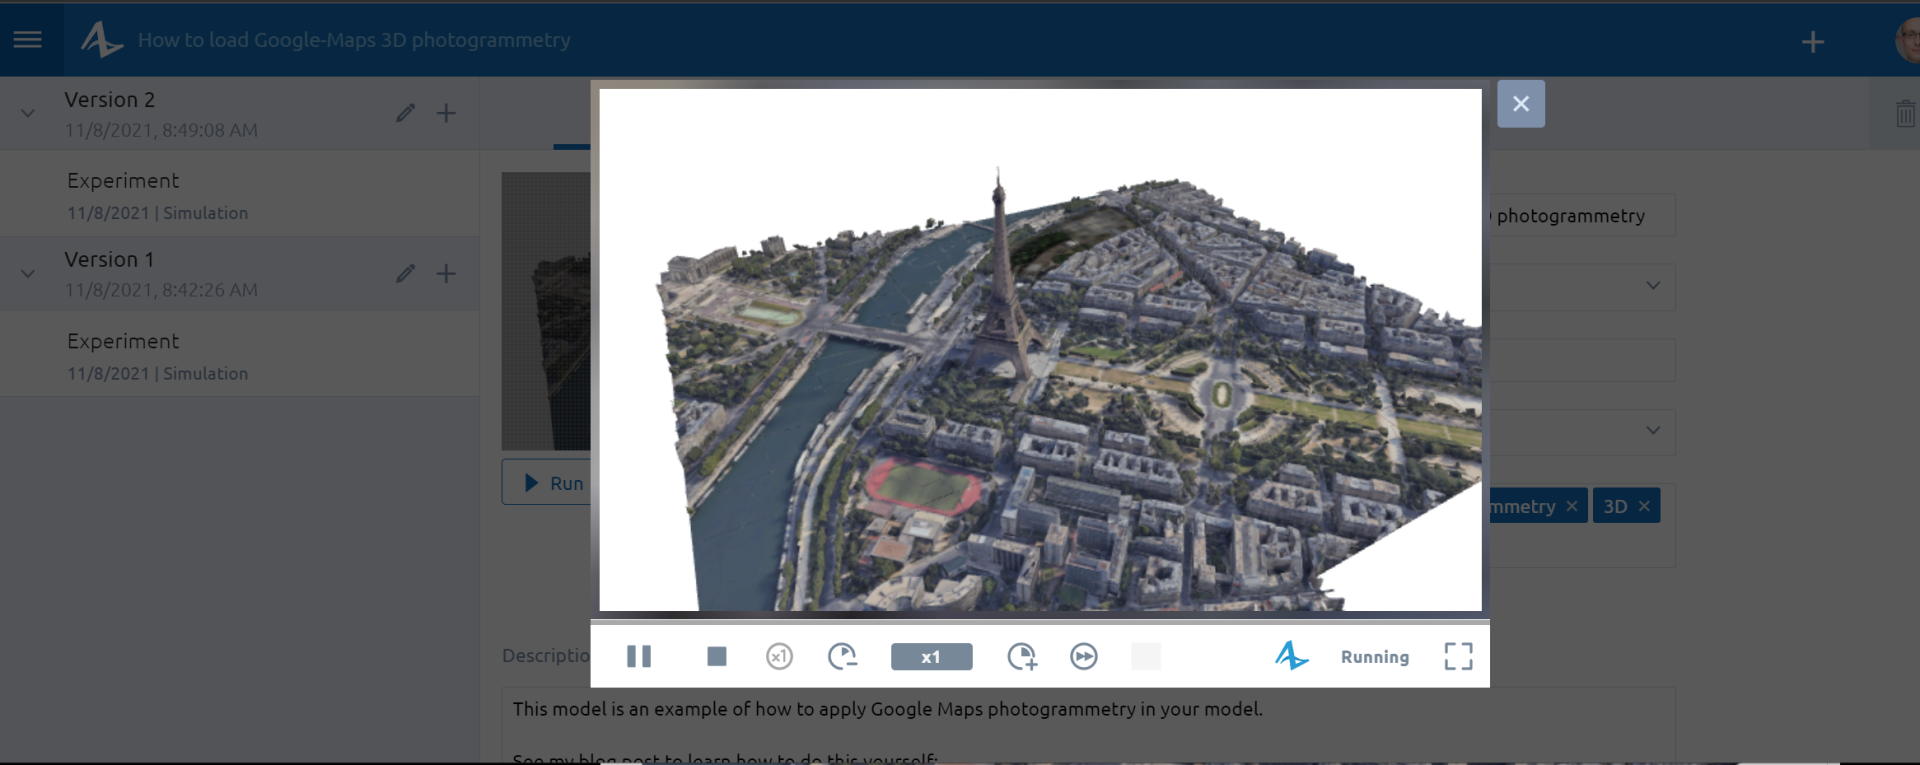
Now, you can upload your model to the AnyLogic cloud as usual. It will take some time on the first upload as all image files are transferred. But you will be rewarded with an awesome model as below. If you open the Cloud model, you will also get access to the model files, if you want to see how I did set things up locally in AnyLogic.
Write your awesome label here.
Created with