There are two crucial reasons why you should improve your setup screen UI. First, it will keep you sane. Literally. Assume it takes a few weeks to develop your model. Every time you make a change, you need to test your model. Run it, see the experiment setup screen, load some data, etc. So most likely, you will use your own experiment setup screen hundreds of times. If it is not streamlined for your purpose, you will go mad. I have…
The second reason why you want to have a great setup screen UI is to keep your users sane and happy. They might have enjoyed your explanation of how to load X before Y and make sure that Z is still active… But what about the first time they are supposed to do it alone? If they have a smooth ride, their entire model perception will be heightened. However, if they need to fiddle, get lost and start biting the keyboard, they won’t like the model either. Keep your users happy.
Have a look at the video below: it shows an experiment setup UI I created a few years back for my PhD simulation.
Let´s explore some specific concepts with it:
Notice the start of the model: some buttons are “locked”, i.e. you cannot click them even if you wanted. Moreover, some elements are not visible at this stage at all.
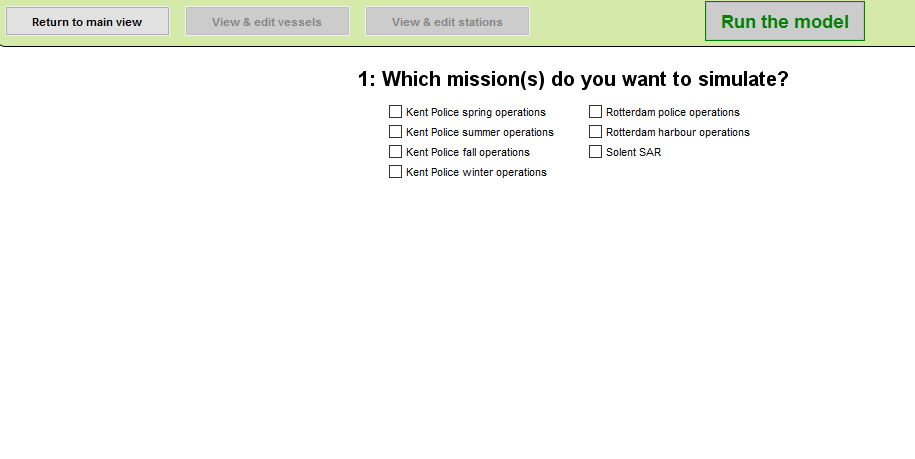
Disabled buttons and invisible model elements...
In AnyLogic, you can achieve this effect by using the “enabled” field of object properties. Each control object (buttons, check boxes, sliders…) has that Boolean field. If you set to “false”, the control will be disabled. In my example, I use a Boolean variable that is initially “false”. I set it to “true” when the user has entered enough information so that the buttons should become clickable:
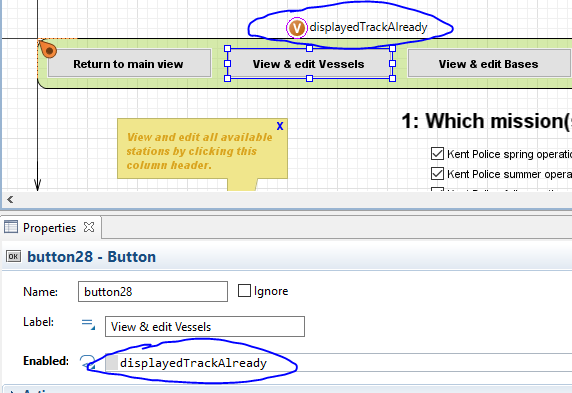
Enable or disable buttons using a boolean variable
For animation objects, the process is similar. The only difference is that objects are either visible or invisible (instead of enabled/disabled). Below, I make the arrow visible when the user has selected at least 1 mission:
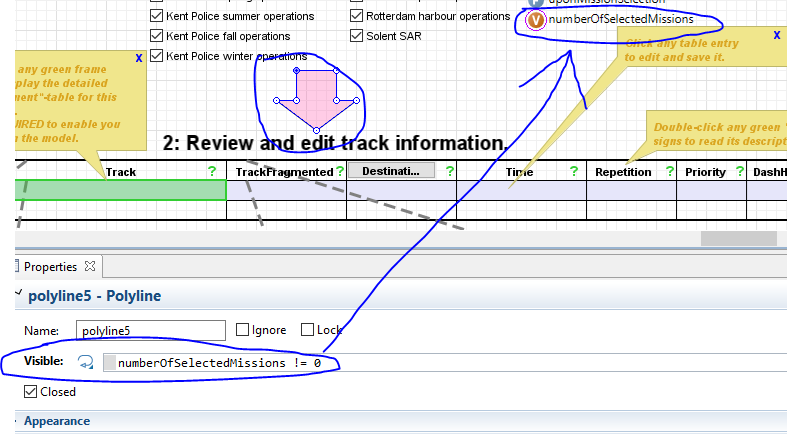
Invisible animation objects use the same approach of boolean variables.
You can help your user to understand the setup by providing little explanatory messages (like every good app these days when you first open it). In my example, I created little yellow post-it style messages describing various aspects of the UI. The user can close them intuitively. Technically, they consist of a polyline external frame (filled with the yellow color):
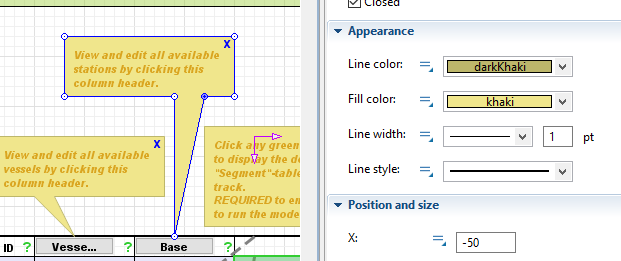
Polyline used for a pop-up message
I drag a “Text” object into that polyline and set up the descriptive text. In addition, another text object becomes the closing “X” at the top right corner. This text becomes functional: When a user clicks it, I want the entire pop-up to disappear. Every animation object in AnyLogic has the “On click” code box. Let’s use code to achieve our goal:
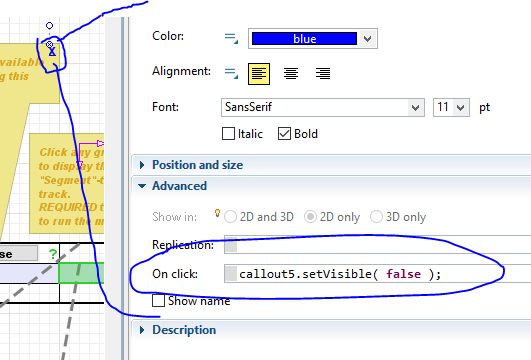
Close a pop-up using an interactive text object
Note that “callout5” refers to a group of objects that include the polyline, the description text and the “X” text object so they all disappear at the same time.
Ideally, all model setup and input data is edited in an external database (or in the build-in database coming with AnyLogic 7.2). Separating data from the model is good modelling 101. However, some users might want to adjust some input data before running a model without fidgeting with a database. This often occurs with “managerial” users that want to play but not get technical (where even opening an Excel file can mean the end of the world).
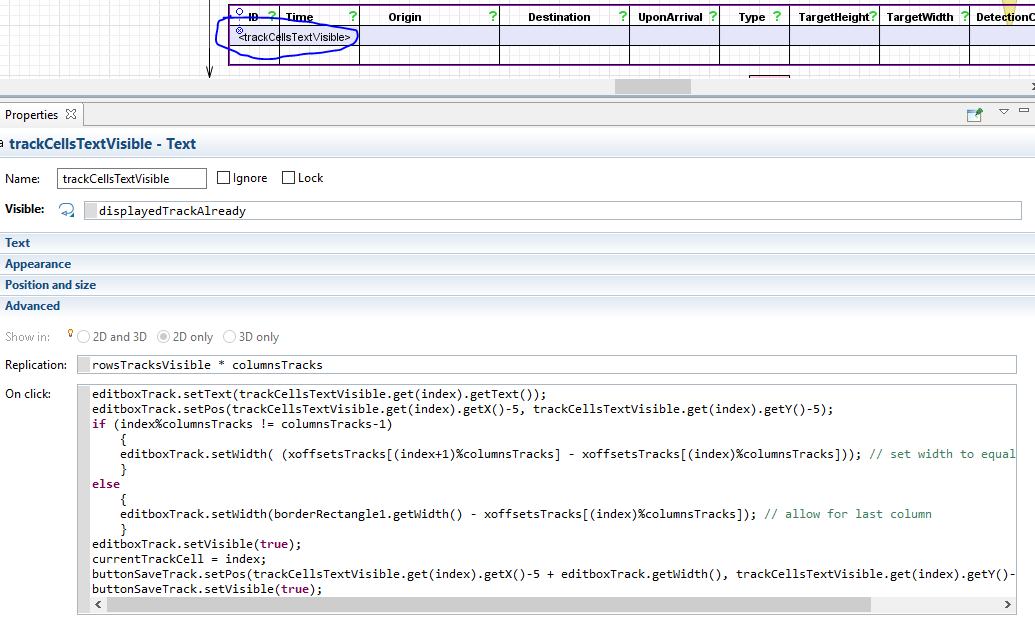
Reproducing an Excel-like table as in my example is fairly advanced. Let’s have a brief look how I achieved this. Don’t worry if this sounds too complicated, it’s quite Java heavy… Conceptually, I use a replicated Text object with as many replications as cells needed (rows*columns). When I click on any instance of it, I copy its text to an editbox object and move that on top of the text. Next to it, I move a button to save any edits. The user can now edit the entry he clicked on:
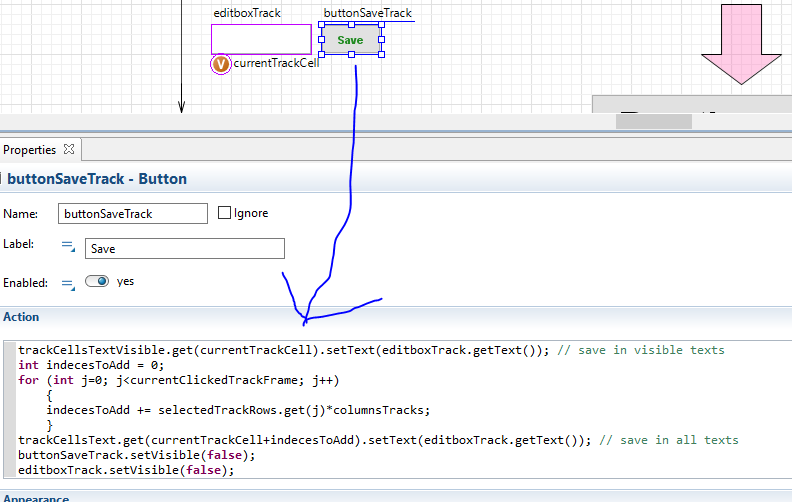
Once she edited something (see my video above), he can click the “Save” button. It will store the changes in the local text object instance. When the model starts, it will use these amendments instead of the original data:
The last practical tip considers crazy users. I have been a crazy user and so have you (I am sure).
I am talking about people that are overwhelmed by a UI and start random acts of clicking. The try to learn what is going on by just trying whatever is possible. While there is nothing wrong with this behaviour (my 2-year old daughter seems to learn exclusively using this method), you need to anticipate it.
Whenever your UI unfolds, make sure users can just click things they are supposed to click on. More importantly, avoid enabling them to crash things. Did he just choose a setting that is impossible for your model to process? Avoid that using some checks.
I hope you got some inspiration how to improve your experiment setup UI. Next week, we will continue our UI series by investigating the actual simulation model. How can you make life easier for users and yourself while running a model?
Until then, let me know about your worst UI experience, be it with simulation models or else.